
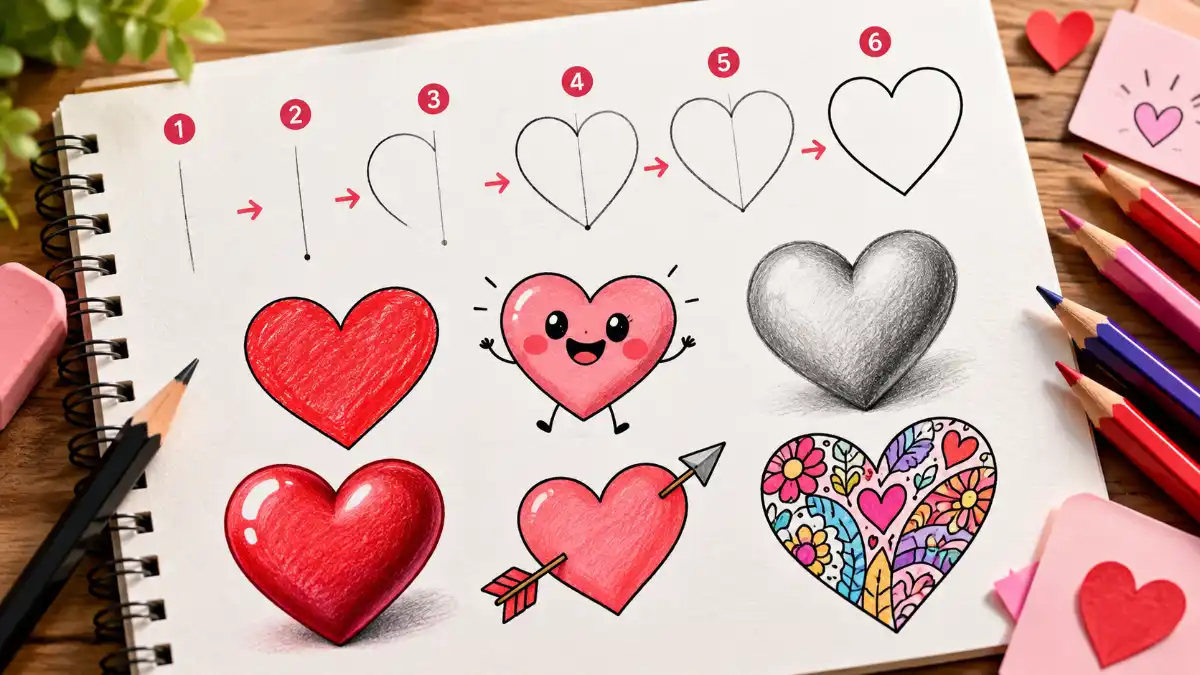
A heart drawing is simple to make with a pencil and paper. Start with two rounded curves at the top, bring the sides gently downward, and join them at a pointed bottom. That’s all you need to create the familiar heart shape. It’s an easy place to start if you’re a beginner, a student, or someone who enjoys drawing in their free time.
Once you’ve mastered the basic outline, you can experiment with smiling cartoon hearts, pencil shading, colorful patterns, and decorative designs. Whether you’re making a greeting card or decorating a notebook, learning how to draw a heart gives you plenty of creative possibilities.
How to Draw a Heart in 6 Easy Steps
You don’t need special drawing skills or expensive supplies. Grab a pencil, an eraser, and some paper. A light center guideline will help you keep both sides balanced as you draw.
Step 1: Draw a vertical guideline
Lightly draw a short vertical line near the center of your paper. This will serve as a reference for positioning the rounded top sections and pointed bottom.
Step 2: Mark the bottom point
Place a small dot near the lower end of your guideline. This is where the two sides of the heart will eventually meet. Keeping it centered makes the finished shape easier to balance.
Step 3: Draw the left upper curve
Begin at the top of your guideline, where the little dip between the heart’s two rounded sections will sit. Move your pencil upward and to the left, forming a smooth curve. Continue outward until the line begins to turn downward.
Step 4: Connect the left side to the bottom
Without creating a sharp corner, extend the left curve downward and gradually bring it inward toward your bottom dot. Try to make one flowing line rather than several short strokes.
Step 5: Complete the right side
Return to the top-center dip and draw a similar rounded curve on the right. Bring this side down to meet the bottom point. Both halves don’t have to be identical, but they should look reasonably balanced.
Step 6: Finish the heart outline
Once you’re satisfied with the shape, go over the outline with a darker pencil stroke or fine-tip marker. Erase the guidelines carefully, then leave your heart as a simple outline or color it red, pink, purple, or any shade you like.
That’s your first heart! Practice making a few more in different sizes. You can also try wider, taller, or slightly tilted hearts to see how the shape changes.
This tutorial covers the familiar decorative heart symbol. An anatomical human heart drawing is a separate, more detailed type of illustration.
Easy Heart Drawing Ideas to Try
A basic heart is just the beginning. With a few extra details, you can create charming cartoon designs, pencil sketches, or decorative artwork. These six ideas are suitable for beginners, with slightly more challenging techniques introduced along the way.
1. Simple Heart Outline
If you’re new to drawing, a clean heart outline is a good way to practice steady curves.
Sketch the two rounded upper sections and bring both sides together at the bottom. Once the shape looks right, trace over it with a darker pencil or marker. There’s no need to add shading or color.
Try drawing several small hearts in a row. They make lovely notebook borders and help you develop a steadier hand.
2. Cute Smiling Heart Drawing
Want to give your heart a little personality? Add a face.
Draw a wide, rounded heart and place two small oval eyes near the center. Add a curved smile underneath, followed by tiny circles for rosy cheeks. You can even sketch little arms and feet to turn it into a cartoon character.
Color the heart soft pink or red, leaving small white highlights in the eyes for a cheerful expression.
3. Heart Drawing With Pencil
Pencil sketches are perfect for practicing light outlines and gentle shading without needing colorful supplies.
Begin with a soft outline using an HB pencil. When you’re happy with the shape, darken the edges slightly and erase any unnecessary guidelines.
Next, shade one side with light, closely spaced strokes. Keep the other side brighter so the heart has some contrast. Build the darker areas gradually rather than pressing hard from the beginning.
For more control over darker tones, graphite drawing pencils are available in different grades, although an ordinary pencil is enough for this exercise.
4. Easy 3D Shaded Heart
A little shading can make a flat heart appear rounded.
Start by drawing a slightly plump heart with smooth, curved sides. Imagine that light is falling on it from the upper left. Leave that area pale while gradually darkening the lower-right portions.
Use gentle pencil strokes to build a gradual change in tone. You can soften the marks with a clean tissue or blending stump, then add a faint shadow beneath the heart to suggest that it’s resting above the paper.
The key is keeping the direction of light consistent. If you’re experimenting with this effect, these graphite shading and lighting techniques explain how light and darker tones create depth.
5. Heart With an Arrow
A heart pierced by an arrow is a classic design for Valentine’s Day cards and romantic artwork.
Draw a regular heart first. Next, sketch a diagonal arrow passing across it. Add a triangular arrowhead at one end and small feather-like details at the other.
To make the arrow appear as though it passes behind or through the heart, erase the portions that should be hidden. This small adjustment makes the design look more convincing.
6. Decorative Pattern Heart
If you enjoy adding tiny details, try filling a large heart with patterns.
Outline, then divide the inside into several sections using gently curved lines. Fill each area with something different, such as flowers, dots, stars, stripes, or swirls.
You could also add initials, a ribbon across the center, or a few smaller hearts around the outside. Mix bright colors for a playful design, or use two or three coordinating shades for a simpler appearance.
Materials and Tips for Better Heart Drawings
You can make attractive heart sketches with supplies you probably already have at home.
- HB or No. 2 pencil: Great for light guidelines, outlines, and everyday sketching.
- Eraser: Helps remove construction marks and correct uneven curves.
- Drawing or printer paper: Provides a convenient surface for practicing and coloring.
- Colored pencils: Useful for adding soft color, gradients, and subtle shading.
- Fine-tip markers: Make outlines darker and decorative details easier to see.
When drawing a symmetrical heart, begin with a center guideline and compare the height and width of both upper curves. Sketch lightly until you’re comfortable with the shape.
Try to move your pencil smoothly through each curve rather than stopping repeatedly. If a line looks awkward, erase it and redraw the section without pressing harder.
Coloring works best when you build it up gradually. Start with light pressure, then deepen selected areas to create contrast. If you’d like to practice blending, these colored pencil techniques cover smooth transitions, hatching, and shading.
Common Heart Drawing Mistakes and How to Fix Them
Your first few hearts might look a little uneven, and that’s normal when learning a new shape. Most mistakes are simple to fix before you darken the final outline.
Uneven upper curves: If one side looks noticeably larger, use the center guideline to compare both halves. Lightly adjust the curve until the overall shape looks more balanced.
Off-center bottom point: A tip that sits too far left or right can make the heart look lopsided. Move the point closer to the center and gently redraw the connecting sides.
Sharp or awkward side curves: Hearts generally look smoother when their sides taper gradually. Replace sudden bends with longer, flowing strokes.
Heavy construction lines: Pressing too firmly at the beginning makes mistakes harder to erase. Use light strokes until you’re ready to finish the outline.
Patchy pencil shading: Instead of filling an area with heavy, uneven marks, build several light layers. Keep the strokes close together and follow the rounded shape of the heart.
Creative Ways to Use Your Heart Drawings
Heart drawings aren’t limited to sketchbooks. They can turn simple cards, decorations, and handmade gifts into something more personal.
For Valentine’s Day, draw a large heart on the front of a folded card and decorate it with flowers, initials, or colorful patterns. You can also create a cutout design similar to this handmade heart card project, which combines heart shapes with a personal message.
Birthday cards look lovely with clusters of small hearts around a handwritten greeting. For notebooks, try drawing tiny hearts along the page borders or mixing them with stars and doodles.
Heart outlines also work well for school art activities. Children can practice drawing symmetrical shapes, experiment with colors, or create decorated hearts for classroom displays. A larger design filled with patterns can become a thoughtful handmade gift.
Read Also: Heart Drawing
Frequently Asked Questions
How do you draw a perfect heart?
An easy way to make a symmetrical heart is to fold a sheet of paper in half. Draw half a heart with its center along the folded edge, then cut around the outline while the paper is still folded. When you open it, you’ll have two matching sides. Trace the cutout if you want a neat, balanced drawing.
Can beginners draw a heart without guidelines?
Yes. Start by drawing one rounded upper curve, then bring the line downward to form the pointed bottom. Repeat the process on the other side, joining both curves at the top-center dip. Guidelines make symmetry easier, but they’re optional. Practicing freehand hearts will help you become more comfortable drawing smooth shapes.